Helping Hands
How To Set Up Your Central OMQ Knowledge Base
In this article, we show how to populate the AI-based OMQ knowledge base with your FAQ, providing all service channels with the same knowledge.

Our system works like a human body. At its core, it has a heart that supplies the body with important nutrients and oxygen, much like our knowledge base does to the support channels with important service information. Paired with Artificial Intelligence, which is the brain, our software is then able to automate the answering process of customer service requests in a number of communication channels.
This article is an in-depth guide about our central knowledge base, and how you can easily set it up to start the automation process.
What does the central knowledge base do?
The main function of our central knowledge base is to store the service knowledge in a same place. It can handle both internal information, those details that are for staff or administrators only, and public information, that will end up going out to the customers.
After collecting service knowledge and storing it in a central knowledge database, it distributes the information to all the linked services channels, allowing all of them to be up-to-date in real time and without any additional manual labor.
How to set it up?
The first step to use and set up your knowledge base with us is to have a user account. If you already have one, just log in with your details. However, if you are a new user, you can always contact us and we will gladly set up a new account for you to start automating your service channels.
You can also create an account directly and test the OMQ system by clicking here
The centralized knowledge base works on a question/answer structure. This does not exclude the possibility of having multiple answers to a question, which we will also teach you how to create those later on.
Pro tip: We advise you to write down the questions and answers in advance. A really easy and efficient way is by having a sheet in Excel or even Google spreadsheets. We would be happy to help you add your existing FAQ to the knowledge base.
Creating Categories
To start your knowledge base, you must first create the categories you will work with. You can later add more if necessary. It might be tempting to start adding questions first, and then categories, but the categories are going to serve as a base structure.

To start creating categories, you would go to the top left corner, where you will find a plus sign. A drop-down-menu will appear after clicking on it, and you should choose the option that reads Add category. A field will open under the plus button, where you can write the name of the new category. Click on the checkmark to save the category. Once added, a folder with the name will appear. The number on the right of the folder name is the number of questions this category has.
Creating Subcategories
If you need, you can always create new categories in a category itself to keep everything more precise and neat. These are called “subcategories”. To create them, first you must click on the main category to open it, and then just repeat the steps as if you were to create a new category: click on the plus button on the top left, and then from the dropdown menu choose the new category option. Name your new subcategory and click on the checkmark to save.
Pro Tip: If you are creating subcategories, we strongly recommend you keep the main category free of floating questions. By this, we mean that you should organize each question into a subcategory.
Editing Categories
To make any changes to the categories, for example changing the name, you have to go to the main index or home first. Once the list of all the created categories appear, you click on the settings button (gear symbol), this will change the list to an editing mode.

To change the name, simply click on the existing name, and it will be selected in blue, then you type in the new name and click on the X button to save the new name.
Moving Categories and Question
To move a category into another, check the box on the right of the desired category and the click on the arrow curving up. This will show a dropdown list of the existing categories, where you can choose where to move the file the moving question/ category.
Deleting Categories
To delete the category, check the box that appear on the right of each category and then click on the trash can symbol to delete.
Creating Questions
After setting up the categories, you can start filling up your knowledge base with questions. At this stage, you will just create the question itself, to later add the answer or answers that match it.

To do this, start by choosing the category you want to fill in and click on the folder name. It will open and appear empty the first time. Then go to the top left corner and click on the plus sign, but this time choose the option Create question.
A form will open on the right side of the screen, where you can write the question. You can also see a field that says Keywords, these will be automatically tagged by our AI.
To save the question before adding a new one, you must click on the check mark. This checkmark will change to orange when there are unsaved changes, and once they are saved it will turn back to gray.
To discard any changes in the question, you can always click on the X, that will turn to black when there are new unsaved changes. It will turn back to gray once the changes are discarded or saved.
To delete a question, simply click on the trash can symbol.
Pro-tip: You might want to add your own keywords, however it is best if you do not do it, as the Artificial Intelligence will learn new keywords with each use, and adds new keywords on its own.
We do encourage you to add the keyword if it is a proper noun for your product or service.
Search questions
In the middle column above the questions you will find a magnifying glass. When you click on the magnifying glass, an input field appears, where you can enter a keyword or an entire question. The system searches automatically as soon as you have entered the first word. You don’t have to press Enter to do this. Here you can also look for questions according to their visibility.
Order Questions
You can sort the displayed questions according to “Modified on” and “Modified by”. With “Changed on”, the questions that were last created or edited are displayed first. The date appears in orange under the question. With “Changed by” the questions are displayed in alphabetical order, sorted by the user.
At the bottom left you will find a menu called “No sorting”, click on it if you want to sort the questions by their last modification date or by their author.
Choose “No sorting” if you want to delete the searching filter.
Pro Tip: The date and the author of a question are always displayed to the right top corner of the question field, on the right side of the screen.
Adding Answers
After creating a question, you can see that there is a form on the bottom to fill the answer. It is a really easy process, and the best of all, you can personalize the answers with our design tools.

To make the answers clearer and easier, as well as fit more your style of customer service, there are a couple of design options. Which can make it easier for both you and your customers to understand the instructions.
To add design features, just click on the Design option, right next to settings. This will show the different objects you can Drag and Drop into the answer field to then edit.
- Headline: This will create a header. It will be more visible as all of it is in Bolds. You can add as many headers as you want, by dragging and dropping them on the answer field.
- Subheadline: It will display the text with the thinner, smaller version of the Headline. It can be used to explain more about the header before it. As with the headline, you can add as many as you want by dragging and dropping.
- Text: The text will be shown in your regular font, with no type of formatting. When pressing enter to have a new paragraph, a new text field will appear automatically for you to edit with the new paragraph. You can add a webpage or email address as hyperlinks in the text box: Just select the word you want to link, and click on the link icon, then just copy and paste the link. Press the Enter key to save the hyperlink.
- Images: You can add images to your answers to have a visual aid or reference. After dragging and dropping the image field, click in the middle, where a camera appears to upload the image you want to display. If you want to add different images to the same answer, you have to drag and drop one field per image.
- List: The text will be shown in list. You can choose whether each point is a circle, a square, a number or shown in roman numbers. This is great if there is a check-list or a number of steps they have to follow. You can also create a list within a list, or a “sublist”. To do so just press the Tab key where you need the sublist to start, this will automatically create it.
Pro tip: If you have a main list and a sublist, you can change the bullet design of their elements. Just select the desired items in the list and choose the bullet design that fits best.
- Source code: This field allows you to show the source code with line numbering. You can either write it manually or copy and paste, and you can specify what syntax you are using by clicking on { }, which will open a list where you can choose the coding language from. The field will show up as an object and then the users can copy and paste it from there.
- Link: This field allows you to link another page, or even an email if they need to contact you any further. The link text will show up as an orange underlined text and then with the linking option on the left corner, you can add the page you want to link it to.
- Download: Here you can upload files that users can late download, whether it be a manual instruction or something else. Just add the file by clicking on the field. You can add more than one file, but the maximum size is 10 MB.
- Web Content: If you need to showcase some web content as a visual aid, or to guide through, this option will display it for you in the answer field. Just drag and drop the object, and then click on the linking option to add the URL of the web content you want to show. It will appear in the answer.
- Note: This text box will appear highlighted. As with the Text box, when pressing enter to create a separate paragraph a new box will appear below as a new highlighted text box. You can also link specific words to a URL or email address.
- Video: If you have a video that explains or helps users with a step by step, you can also display it in the answer field by linking the video. It will appear as an object, that the users can play directly. The video must be in Vimeo or YouTube, as those are the platforms the knowledge base supports.
Changing your answer later on
You can change your answer at any time by clicking on the answer field of the question and editing the answer as usual.
Delete answer
To delete an existing answer, click on the trash can symbol.
Visibility Options
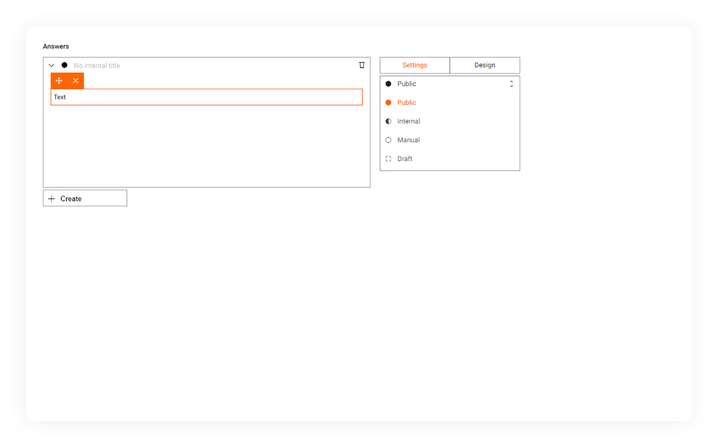
Publishing: the first menu in the settings options gives you for different publishing choices, which will determine to whom the answer will be displayed. It is really important to double-check it is published right, to avoid headaches.

- Internal: This option allows you to save an answer, but only be display to the agents and staff, who have access to the system. I will not be seen by the public.
- Public: Probably the one you will mostly use. It publishes the information and opens it up to the public. It will be seen by your customers.
- Manual: This option works only for our product OMQ Assist. The answer will only be shown to the service agents and will not be sent to the customer.
- Draft: It will save the answer to the knowledge base, but it will not be pushed out as it is saved for later confirmation.
Before you change any other settings, save the question and answer once the answer editing and visibility setting are complete. This way you make sure you have the information in the knowledge base, so you don’t lose any progress. Click on the orange checkmark to save the changes.
Setting Starting and Ending Dates
Open or specific dates: the next two menus will determine whether the information is seasonal, or ongoing.

-
Ongoing: if the answer is standard and will be used all year round, you will not change anything from the two menus. This information will be seen all year round.
-
Seasonal: seasonal answers require more detail, as they are bound to change. These options are great for seasonal sales, or events. You can add multiple seasonal answers and set their dates, so that it automatically changes when the period for one is over and the other starts.
To do this, just click on ”+ Create” button below the answer field to add another answer.
Pro-tip: You can give the first answer anexpiration date and then second answer a following start date.
To program these type of answers, you need to set a starting point on the Start Date menu. Then you can choose the date it will end by setting it on the Expiration Date. Pay close attention to the dates you choose, so that they match up with your plans and events.
Choosing Additional Categories
Category Tagging: This will make your question/answer pair in the categories they are tagged in. If you find that the answer fits for more than one category, just click on the menu Select category, and check the names that match. Below that menu, you will see the folders the answer was tagged in.

Country specific answers
If you have a wide market, the answer might vary from country to country, and we make it possible for you to create those answers and maintain them separately.
To do this, click on the option below the typing box, that reads Create with a plus sign. There you can adjust and set the new answer with all the same settings named before, and making the answer specific to a country by adding an internal title to the answer followed by a dash and then the country code.

Pro-tip: This will only work if the country have the same language. So for English, you can show one answer for the United States, another for the United Kingdom and another for New Zealand, according to your policies. But you would not be able to also add the different answer for Spain, because they do not speak English.
Easy Language Shift

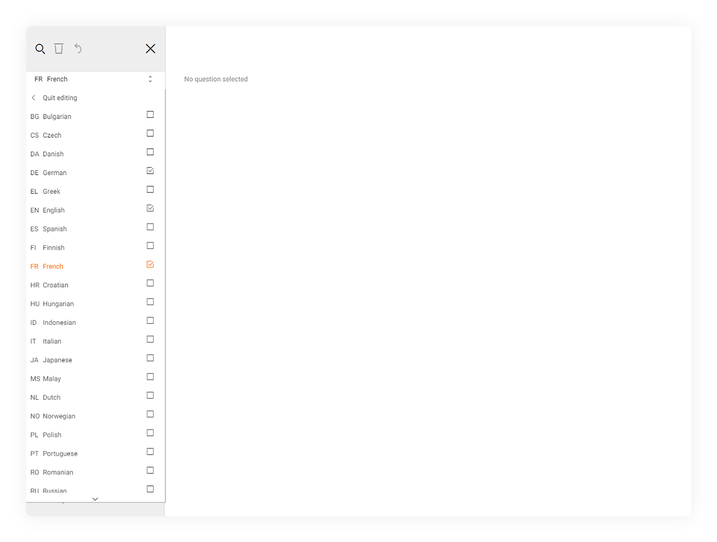
Our system is able to support more than 30 languages, which is great if your customers are overseas, or you want to expand your market. However, we do not offer translations services. It is the company’s own responsibility to do the translations of both the question and answers.
To add a new service language, you can click on the bar that shows which language you are currently for your knowledge base. Then you should click on the Change languages, which will show you the whole list we currently support, and by checking in the box in front of the language, it will add it, exporting the categories you had already created before.

The names of each category might need some adjustments depending on the language. To do this you should go to the language in which you need to adjust the categories names, and then click on the gear symbol for settings, and it will show you the names together with some check boxes. Just press on the name of the category you want to change, add the new name, and it will be safe just for that language. It will not change the name of the same category in the other languages.
Pro-tip: You can follow the same steps to change the name of a category if you think it will fit better than the one you chose before.
Where can I use my knowledge base
It might take a few minutes to completely update, nevertheless after that it will be ready in all linked service channels that we offer. With time, our AI will be filling in some keywords and pairing them with the information you have in your knowledge base, making it more precise with each use.
You can use this centralized knowledge base with our 3rd party integrations, which will give access to our plugins directly from their services. Currently, we have the following integrations available:
- Userlike
- Freshdesk
- Zendesk
- Dixa
- Shopaware 5 and 6
- Greyhound
- OTRS
You can also use the knowledge base with our own software products, which do not require additional partners involved, and it is done directly with us. We support the following communication channels: ticket systems , chatbot, email, help page and contact forms.
If you are interested and want to know more about our products or would like to request a demo, feel free to contact us. We are more than happy to help you get started! :)


