Helping Hands
How to Create a Self-responsive Contact Form in Shopware 6
With our self-responsive contact form OMQ Contact for Shopware 6, customers get a solution immediately and the number of service requests is significantly reduced.

In addition to our integration into Shopware 5, we also offer integration into Shopware 6 for our products OMQ Contact and OMQ Help.
In this tutorial we will show you how to integrate OMQ Contact into Shopware 6.
A contact page that responds instantly – OMQ Contact
OMQ Contact is an automated contact form. As soon as the customer enters their question, the appropriate answer options appear in real time next to the form. Since the customer can see the right answer to his question immediately, he does not send his request. OMQ Contact thus offers the fastest support and avoids the creation of tickets by automatically answering customer enquiries.
Other benefits of OMQ Contact are…
- Real-time answers in the contact form
- The AI understands the customer’s concern
- Adapts to the corporate identity of companies
When writing the message, Artificial Intelligence understands your customer’s concerns and suggests a suitable answer. With each request, the software learns independently and gets better and better. For example, AI understands that with a request “my bow broke” the same is meant, as with the question “How can I claim my glasses if they are damaged?”
The OMQ Knowledge Base
The core of the OMQ system is the central OMQ Knowledge Database, which collects and manages service knowledge. Thanks to the AI technology used, the knowledge base learns across all channels and becomes more precise with each request.
The system uses feedback from both customers and service staff to continuously improve the quality of the response. All OMQ products are linked to the central knowledge database. This ensures that all communication channels are provided with the same service knowledge.
The online shop system of Shopware
Shopware was developed in 2004 in Germany and is an online shop system. This means that you can use the software to create your own online shops. With different versions and extensions, users can customize their own shop according to their needs and desires. The software is very flexible, scalable and also allows individual design for different target groups.
How to integrate OMQ Contact
To integrate OMQ Contact into Shopware 6, follow these steps: You download our plugin, go to the gear icon in the left bar and then select OMQ Contact in the plugin settings.

There you can log in to your OMQ account or create a new account and then click on save.

After you have logged in, the message “Success. The unit of measurement was successfully saved.“ Then you can click on the pink icon in the left bar and select the sub-item “Shopping Experience”. Create a new layout. In the next step you select the “Landing Page”.

Now you choose the “Full Width”.

Name your layout and then click on “Create Layout”

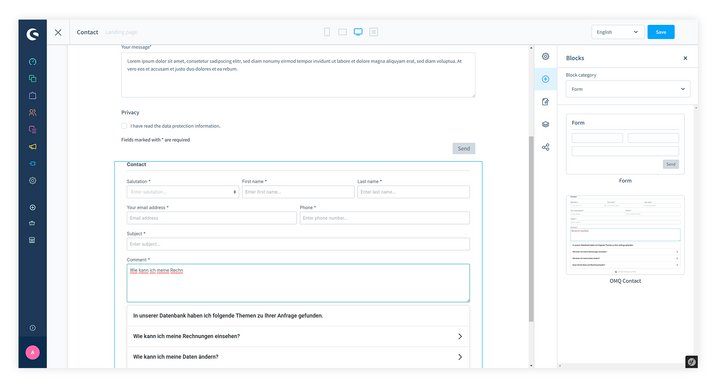
Click on the “Plus” button on the next page. Select “Form” as a block category.

First, drag the “form” onto the blank field.

After that you pull “OMQ Contact” under the first form.

Now click on the cogwheel of the OMQ Contact form.

Now enter your OMQ API key, click on “Finish” and then click on “Save”

Click on the green icon in the left bar and look for the sub-item “Categories”. Open the sub-item “Footer”, then the sub-item “Service” and finally “Contact” (or the name you have chosen).

Scroll to the “Layout assignment” and select “Change Layout”. Select your previously created layout and copy it.

Then go to “Edit content”. Check the API key and then click “Save”.

Update your demo store, i.e. reload the page to see your complete contact form. When you scroll to the end of the contact form you will find OMQ Contact.

Any more questions?
If you would like to learn more about us, our products or our extensions for other systems, please feel free to contact us. Are you interested in our software and would like to request a demo directly? Then click here. We are looking forward to seeing you! :)


